Recently I started using Amazon AWS and quickly realized that provisioning virtual machines, security policies and other network configurations is done one by one, which is tedious and needs to be automated. I had two options: either create a custom script to provision every single service or learn how to use CloudFormation.
CloudFormation is a provisioning tool for AWS resources that requires a YAML/JSON formatted file inside which cloud infrastructure is described. This definitely seems like the better option, but being completely new to AWS the learning curve is steep and it is difficult to understand the terminology, the various components and how to combine them. Even the graphical user interface, the “CloudFormation Designer” is not that easy to use for new users.
What did I do? First I learned how to provision all the components manually one by one, which took more time than I would like to admit, but was essential for me to understand the components and which ones depend on another. Eventually manually provisioning resources became easier and all the different services became familiar, that allowed me to transition my set up to CloudFormation. It was a long process. Hopefully this article will allow others to use CloudFormation much sooner.
It’s difficult to cover all scenarios and edge cases, so please be prepared to dig through some AWS documentation and learn more about some of the individual components. Unfortunately, there are always some road bumps…
However, I’m confident, that providing you with my configuration example will make learning CloudFormation easier. There are a few things I will skim over for the sake of keeping this article short and to the point. Please use the comment section to provide feedback and ask questions.
Goal
The goal of this tutorial is to set up a single virtual machine and expose it to the internet using CloudFormation.
Requirements
To follow this tutorial an AWS account is required. The AWS command line interface is not needed.
AWS has a free tier, that should allow you to follow this tutorial at no cost: https://aws.amazon.com/free/
AWS services and resources
The following AWS services, also referred to as resources, are needed for a simple virtual machine (VM) setup:
- Stack — A set of resources provisioned and managed by CloudFormation is referred to as a Stack.
- Image — Images (AMI) describe the root volume of a virtual machine. For example they can contain the operating system or application server.
- Virtual Machine — It’s basically an artificial computer. It behaves like an actual computer but does not physically exist. It exists and runs on a server. Virtual Machines come in different sizes (CPU, Memory (RAM) and other hardware components) and can be based on different images.
- Storage Volume — A hard drive that is plugged into the virtual machine.
- Security Group — Security group is a virtual firewall for our set up in AWS. It controls all traffic in and out of segment (VPC) of the AWS cloud.
- VPC — Every computer and cloud infrastructure needs networking. To protect our instance in AWS, we create a virtual network, exclusive for our purpose, also called a Virtual Private Cloud (VPC)
- Subnet — A subnet defines the range of IP addresses in our VPC
- Route Table — Defines and determines traffic flow
- Internet Gateway — Internet Gateways enable communication between our VPC and the internet
- Elastic IP Address — An Elastic IP Address is a static IPv4 address. It can be reused and point to different VPCs.
- CIDR blocks — CIDR blocks define valid IP address ranges and are needed by Subnets
- Associations — CloudFormation requires associating certain components with each other. For example a Subnet and a Routing Table.
- KeyPair — Amazon EC2 requires keys for accessing a virtual machine. These ssh keys are referred to as KeyPairs and often the KeyName (name of the key) is required for the creation of virtual machines. Table 1: Overview of AWS Components needed for a CloudFormation set up
The CloudFormation definition file
The CloudFormation file defines what we want to provision. It can define all the components above and much more.
I think of it as the one file to rule them all, even though you can have as many CloudFormation definition files as you want.
The definition file can be written in either JSON or YAML. I chose YAML because the notation is shorter and it’s easy to add comments. Feel free to use the notation of your choice though, the CloudFormation designer can convert between either format with a simple click.
The basic structure my template uses entails 3 major sections (there are more, but we don’t need them right now).
- Parameters
- Mappings
- Resources
Parameters
The Parameters section allows for the definition of inputs that can be provided through the AWS interface or the AWS CLI when creating an instance. It’s optional, but quite useful to make our configurations more reusable. In this section we define parameter-name, expected value type, data value validation, description and default value. They’re especially useful once we get really comfortable with CloudFormation.
Parameters:
  KeyName:
    Default: 'EC2Key'
    Description: 'Enter name of an existing EC2 KeyPair to enable SSH access to the instance'
    Type: 'AWS::EC2::KeyPair::KeyName'
    ConstraintDescription: Name of an existing EC2 KeyPair.
  StackPostfix:
    Default: 'vm-1'
    Description: 'Postfix for this vm stack. This is purely for ease of use, to recognize a particular VM more easily.'
    Type: String
    MinLength: '1'
    MaxLength: '64'
  InstanceType:
    Description: 'WebServer EC2 instance type. Change based on application needs.'
    Type: String
    Default: t2.micro
    AllowedValues:
      - t1.micro
      - t2.nano
      - t2.micro
      - t2.small
      - t2.medium
      - t2.large
    ConstraintDescription: must be a valid EC2 instance type.
  CidrBlock:
    Description: 'Enter CIDR block that the VPC should use. Example: 10.0.0.0/16'
    Type: String
    MinLength: '9'
    MaxLength: '18'
    Default: 10.0.0.0/16
    AllowedPattern: '(\d{1,3})\.(\d{1,3})\.(\d{1,3})\.(\d{1,3})/(\d{1,2})'
    ConstraintDescription: must be a valid IP CIDR range of the form x.x.x.x/x.
  LimitedSSHAccess:
    Description: 'Enter CIDR for network that may access via SSH'
    Type: String
    MinLength: '9'
    MaxLength: '18'
    Default: 0.0.0.0/0
    AllowedPattern: '(\d{1,3})\.(\d{1,3})\.(\d{1,3})\.(\d{1,3})/(\d{1,2})'
    ConstraintDescription: must be a valid IP CIDR range of the form x.x.x.x/x.
In my template I’m defining 5 parameters with following default values:
- The EC2 key that may be used to connect to the EC2 instance. A key is required to connect to your VM via SSH. When creating an EC2 instance manually through the web interface AWS will offers to create one for you. However, when using CloudFormation we need to create a key beforehand.
- The StackPostfix, is of no functional value, it just describes a string that will be appended to all the components that this CloudFormation template will create. I find it helpful to have a consistent postfix throughout all resources when looking at them through the AWS console. It allows for quick identification, which virtual machines all resources belong to. The default value is
vm-1. - The instance type defines which EC2 virtual machine instance type should be provisioned. For testing purposes it is configured to use one of the smallest available instances types:
t2.micro. - The “CIDR block” describes what IP range the VPC should be using internally.
- The “LimitedSSHAccess” parameter allows you to restrict which IP addresses may access the virtual machine via SSH. It’s a good idea to restrict this to the smallest possible IP range. E.g. your personal IP address. If you don’t know which IP address range to use, set it to
0.0.0.0/0, this will allow SSH access from anywhere.
Documentation: AWS Parameters, AWS Instance Types
Mappings
At its core, mappings are just plain key-value matching. We mainly use them in our configuration to map to EC2 instance types — which kind of machines we want to provision (size-wise) and what images we want to use on said instances. AWS provides a large variety of existing images ranging from Windows to Linux distributions or even allowing us to uploading our own. For this tutorial we’ll use an existing Linux based Amazon Machine Image (AMI), that is already provided and that already comes with pre-installed software.
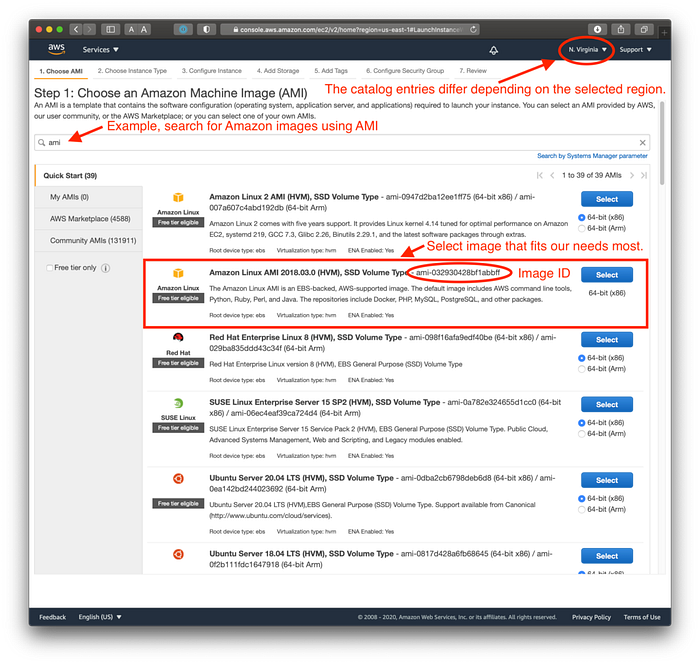
While all images types can be viewed through the general catalog under https://aws.amazon.com/marketplace, we do need to access the EC2 instance creation page at least once, to retrieve the Image ID’s that allow Cloud Formation to understand which exact image we need for our virtual machine that we are going to create. These Image ID’s are region and instance specific. A Linux image in us-west-1 does not have the same ID in us-west-2. Therefore we need to create all the mappings, based on regions.
AWSRegionArch2AMI:
    # Note that image's are AWS region specific. Hence,
    # the "same" image has to be defined per region
    # and the image ID's will vary and additional mappings
    # may need to be added
    us-west-1: #
      # AWS image, comes with docker pre-installed
      HVMA2018: ami-09a3e40793c7092f5
      # Ubuntu 18
      HVMU18: ami-0d705db840ec5f0c5
    us-east-1: #
      HVMA2018: ami-032930428bf1abbff
      HVMU18: ami-0ac80df6eff0e70b5
The marketplace is quite useful, it also gives you estimates on how expensive machines are in certain regions. For example review the pricing information section of this image.
Feel free to browse the AMI Marketplace for Elastic Compute Cloud (EC2) yourself and discover what other images they have to offer.
Documentation: AWS Mappings, Amazon Machine Images (AMI), AMI Marketplace
Resources
Resources are the bits and pieces we need from Amazon. It’s all the components we described earlier.
Note that in the following example, I defined resources with the names
VM, FormationSecurityGroup, VMvpc, VMInternetGateway,...
These names can be customized. The information that tells CloudFormation what the desired resources are is captured in theTypefield.
Resources:
  # Define an EC2 instance. This is our virtual machine
  VM:
    Type: 'AWS::EC2::Instance'
    ...

  # This defines the Security Group, used for the VM above
  FormationSecurityGroup:
    Type: 'AWS::EC2::SecurityGroup'
    ...

  # This defines the VPC
  VMvpc:
    Type: AWS::EC2::VPC
    ...

  # This defines the Internet Gateway
  VMInternetGateway:
    Type: AWS::EC2::InternetGateway
    ...

  # This attaches the Internet Gateway (IGW) to a VPC
  AttachGateway:
    Type: AWS::EC2::VPCGatewayAttachment
    ...

  # This defines a Subnet
  VMSubnet:
    Type: AWS::EC2::Subnet
    ...

  # This defines the Routing Tables for our subnets
  PublicRouteTable:
    Type: AWS::EC2::RouteTable
    ...

  # This defines the routes. Public route table
  # has direct routing to IGW
  PublicRouteVM:
    Type: AWS::EC2::Route
    ...

  # Associate Routing Table to Subnet
  SubnetRouteTableAssociation:
    Type: AWS::EC2::SubnetRouteTableAssociation
    ...

  # This defines the Elastic IP Address.
  # On creation AWS will provision an
  # IP address and will then be usable for your VM
  ElasticIPAddress:
    Type: AWS::EC2::EIP
    ...
This is just a basic structure of what goes into the resource section of the configuration file. Review the entire template for more details.
Documentation: Resources Reference, Template Structure / Anatomy
Provision a virtual machine
Now that the most important components and pieces are covered, we can provision the virtual machine. The following 4 steps walk us through the creation of a set of SSH keys for AWS, how to submit the template to the CloudFormation designer and how to create a Stack with it. Lastly we will run a small web server to validate a successful deployment and cleanup the stack.
1. Create KeyPair
Go to the EC2 management and create a KeyPair. If you’re using North California (us-west-1) you may use this link and select "create key pair". For a different region, make sure to change to select the desired location in the top right menu, then go to the "EC2" service > scroll down to "Network & Security" > "Key Pairs".
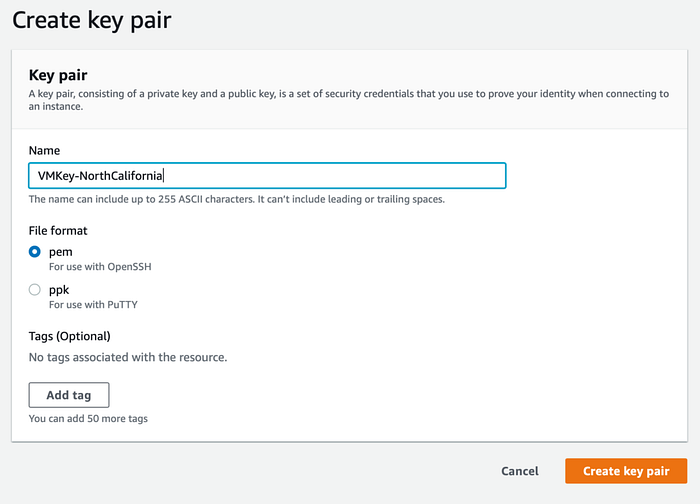
pem.2. Open the CloudFormation designer
The CloudFormation designer can be opened from the website https://aws.amazon.com/cloudformation/ or from the AWS Console by navigating to the CloudFormation service and then selecting “Create Stack” and then “Create template in Designer”.
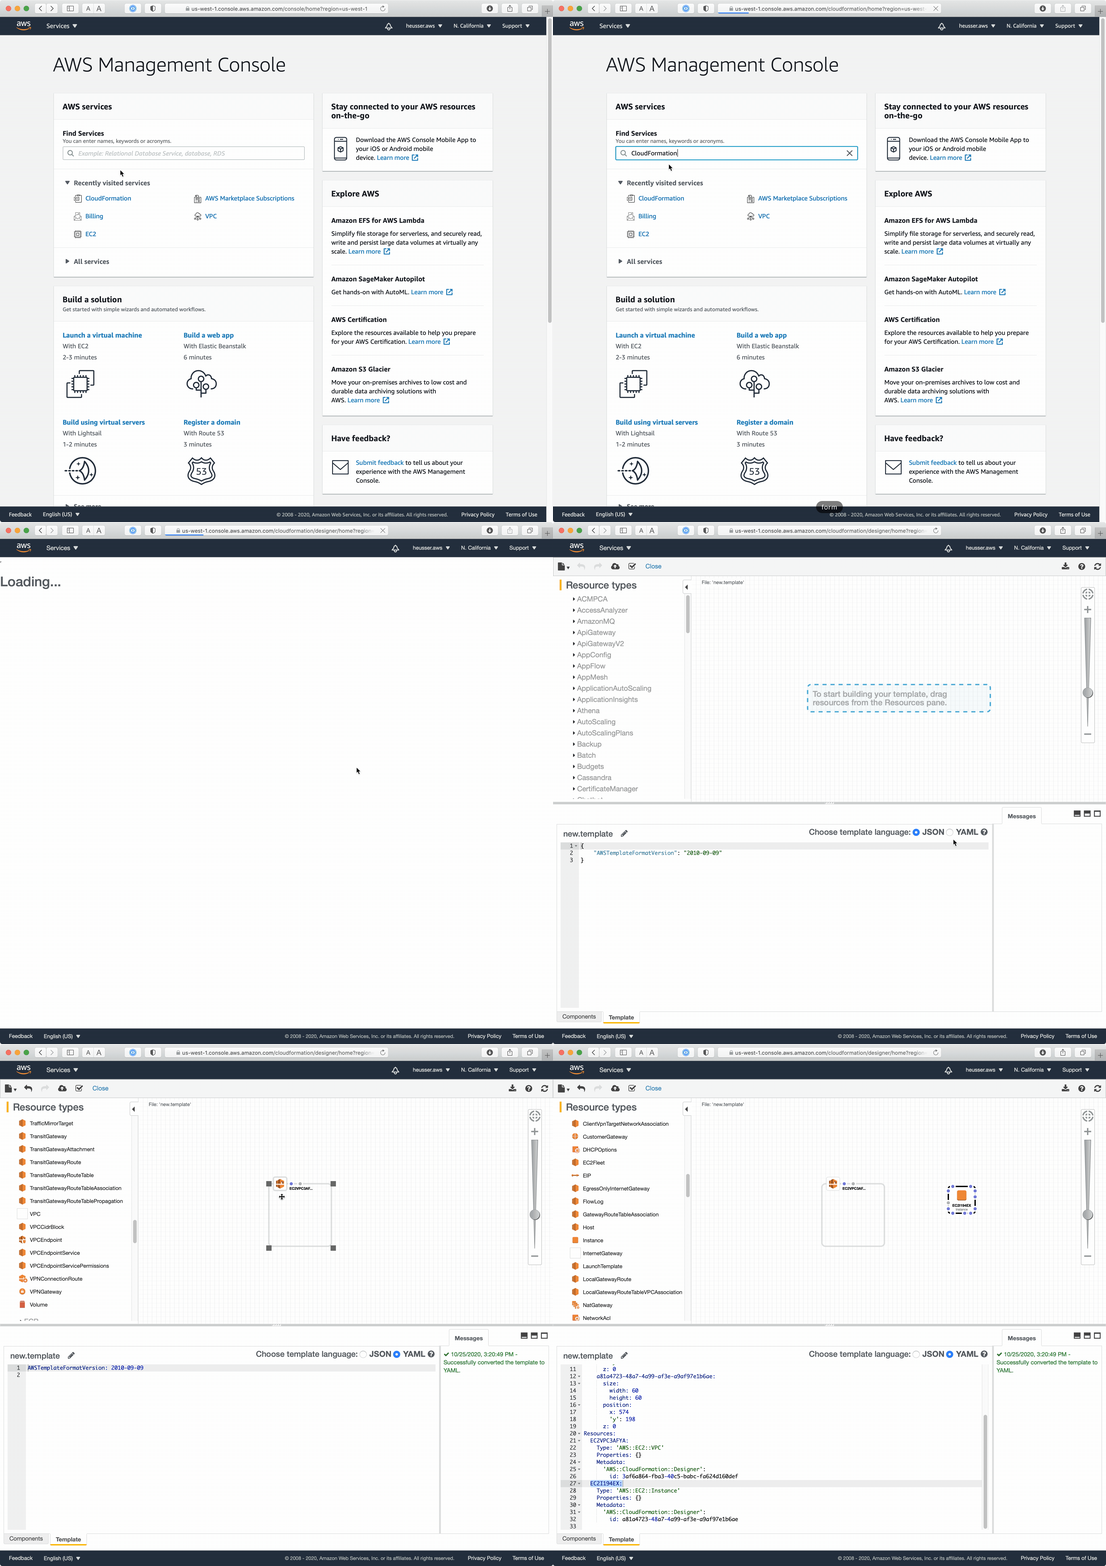
After opening the designer, select “template” at the bottom left and then change the editor template language from JSON to YAML.
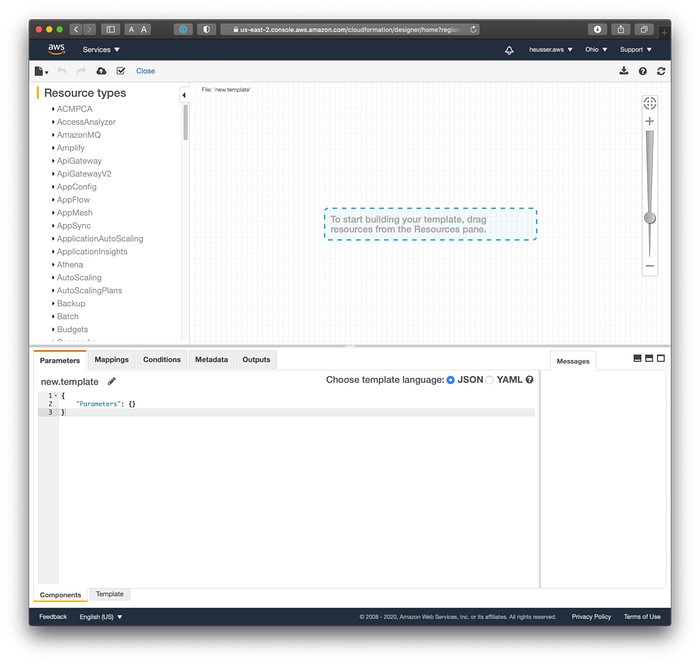
Then copy my template from GitLab into the template viewer and select refresh in the top right. The interface should then update and display something like the screenshot below:
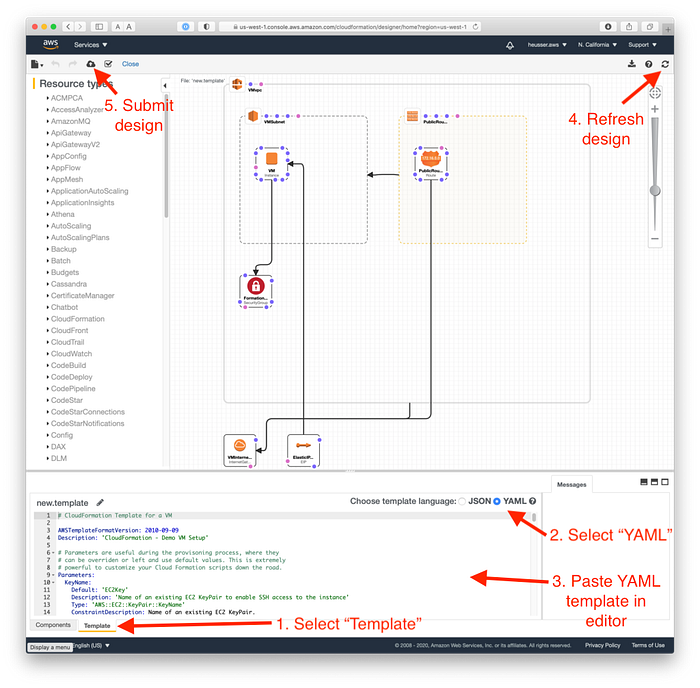
The YAML defines all the resources and associates individual components together. Feel free to browse through it and review all the components. I added comments that hopefully explain what most of the various resources do and what they are for.
Make sure to update the
LimitedSSHAccessCIDR block to an IP range that works for you, before proceeding, otherwise you won't be able to access the machine later.Example, if your IP address is
67.188.42.123a possible CIDR block would be67.188.0.0/16
When ready, submit the design to the CloudFormation service by selecting the “Create Stack” button in the top left.
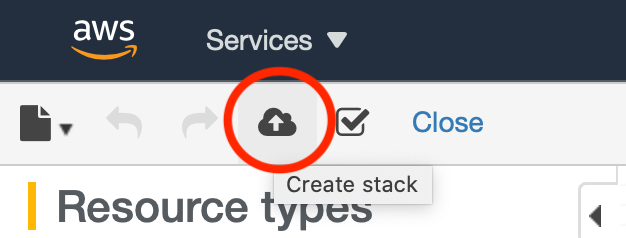
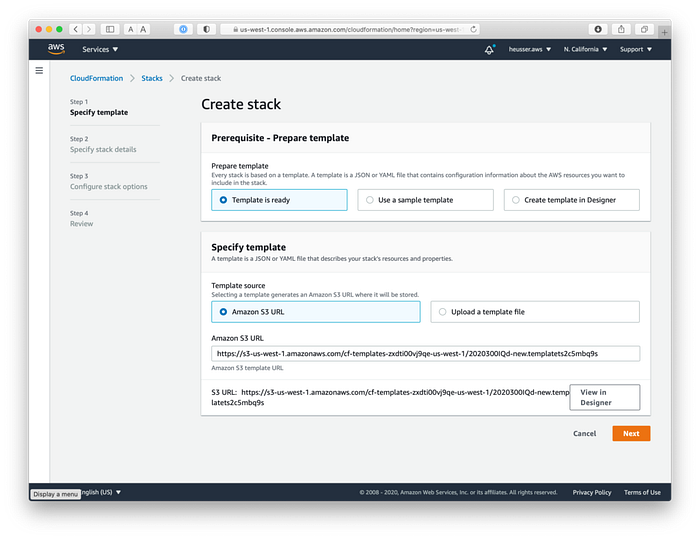
The CloudFormation stack creation process should be displayed and “template is ready” should be selected. When ready, select “Next”.
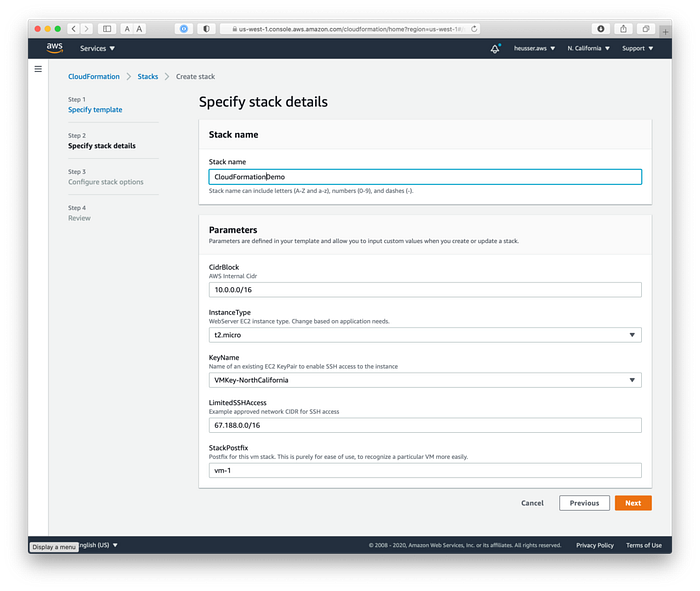
The stack detail screen will be displayed next, asking for a name for the stack and allowing the parameters to be changed. Change them as desired and make sure to change the “KeyName” to the KeyPair that was previously created in the EC2 AWS service section.
Once the details section is complete continue selecting next until we reach the “review” screen and select “Create stack” after verifying all values.
3. Creating the CloudFormation stack
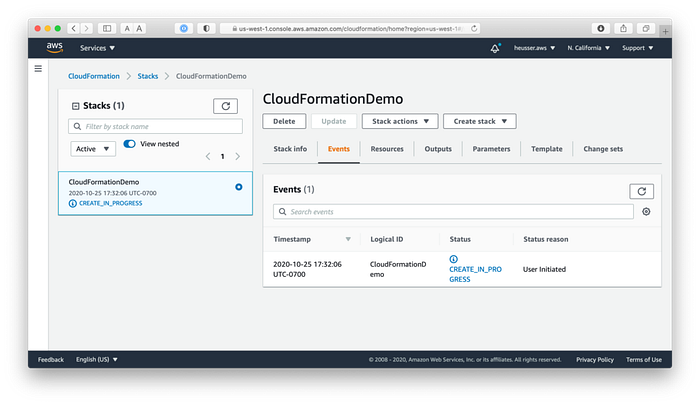
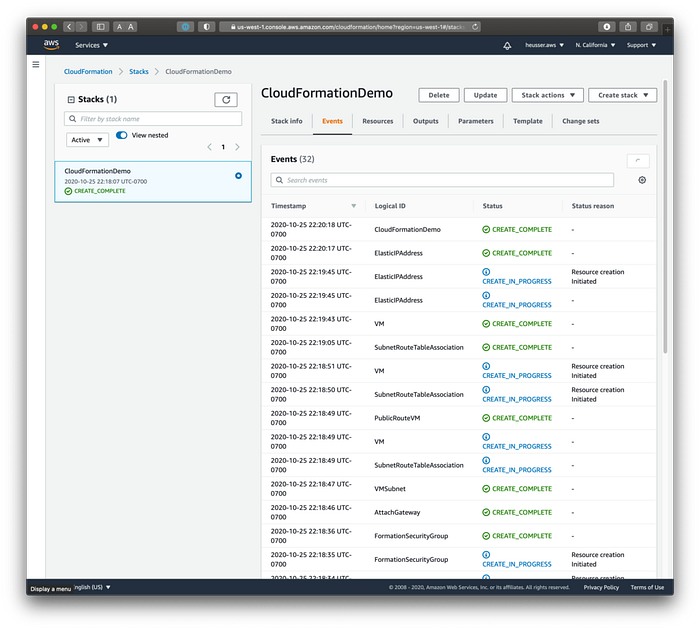
CloudFormation will now provision the EC2 instance and all required components. The events section can be manually refreshed and will contain more event entries over time as CloudFormation provisions more and more of the requested resources.
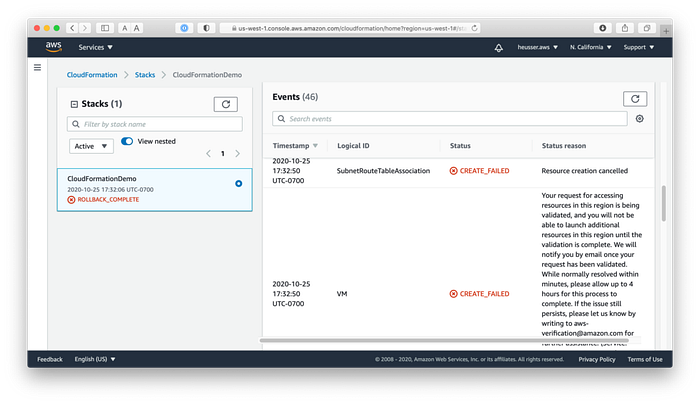
Should an error occur, the entire stack creation will be aborted and any resources of the stack, that were successfully created, will be removed.
If everything goes well CloudFormation will eventually switch from CREATE_IN_PROGRESS to CREATE_COMPLETE.
4. Review running VM instance
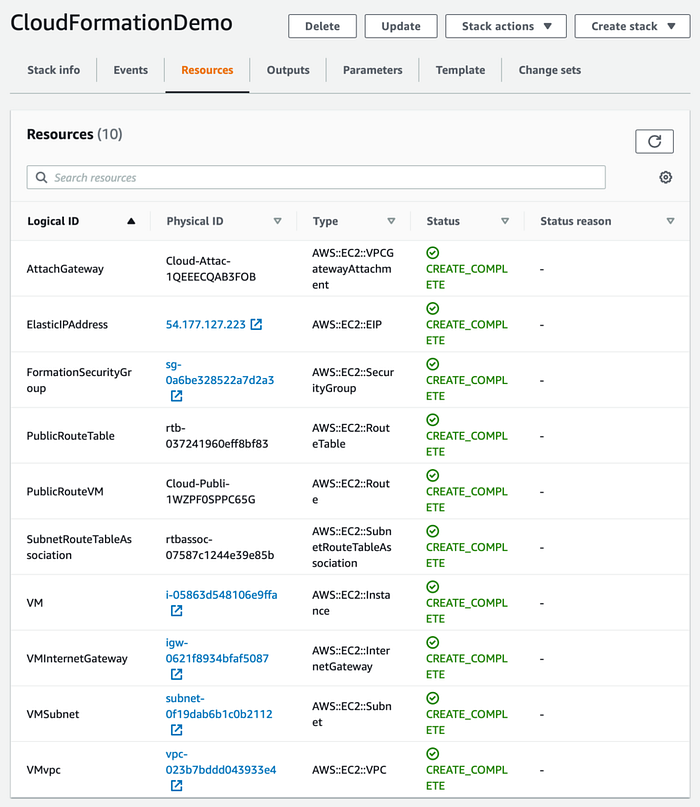
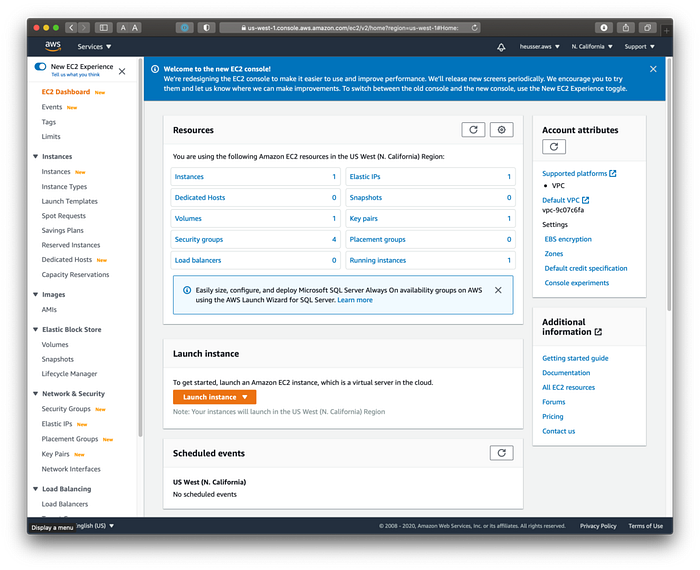
If everything works out as expected, the instance of our VM should be running and accessible via the internet. In the CloudFormation section of AWS the CloudFormationDemo stack should be successfully created and listed.
By opening the AWS Console website we can navigate to EC2 and should see a running instance of vm-1. Furthermore, under "Network & Security" > Elastic IP addresses, the public IP address with which we can reach our virtual machine can be reached, should be listed as well.
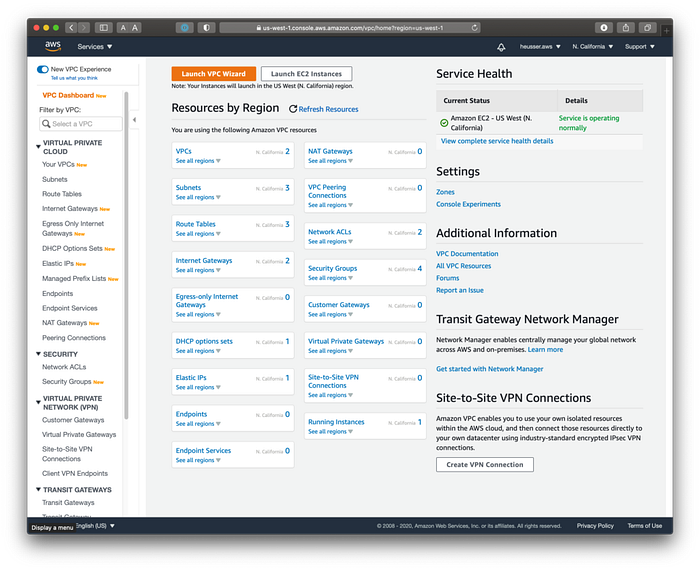
Navigating to the VPC services should allow us to see the definitions of the VPC, subnets, routing tables and internet gateways.
Currently there’s not much to see when hitting the public IP address of the virtual machine. However, by SSH’ing into the machine using ssh -i {KEY_PAIR_NAME}.pem ec2-user@{IP-ADDRESS} and then starting a Python web server, it should be possible to see the following page:
#### Connect to VM
# Replace KeyPair and IP address placeholder
# The IP address is whitelisted through the
# LimitedSSHAccess parameter
ssh -i {KEY_PAIR_NAME}.pem ec2-user@{IP-ADDRESS}

#### Create and use demo directory
mkdir ~/demo
cd demo

#### Create dummy website
echo "<h1>Hello World</b>" > ~/demo/index.html

#### Start web server
# The use of port 80 is defined in the
# FormationSecurityGroup
sudo python -m SimpleHTTPServer 80
Generally we should avoid using sudo.
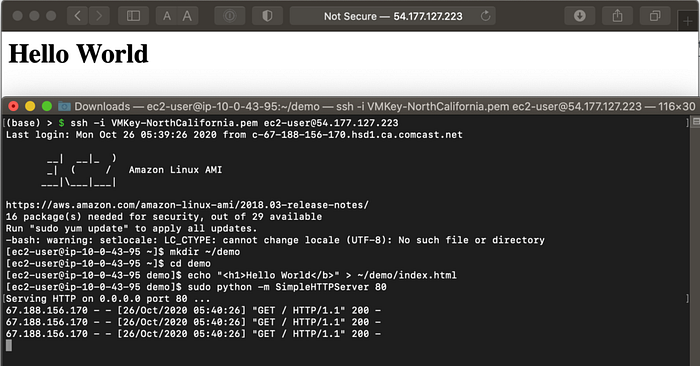
If everything works out as planned we are able to SSH into the virtual machine and start a web server. Connecting to the same IP address using the browser should then result in the expected website.
Awesome, we just created a CloudFormation stack! It’s time to celebrate 🥳
Delete the stack
After a celebration we need to do the boring, but necessary part — we need to clean our mess up. Fortunately it’s fairly easy, so that when we’re done testing and playing around we can just delete the stack. Removing the stack will clean up the virtual machine, including all other provisioned resources. Navigate to the CloudFormation service, select the stack and click “Delete”. This will delete all related resources. Refresh the event section after a little bit to make sure the deletion completed successfully.
Tip: Check into the billing and cost management section of AWS Console 1–2 days later and verify that no unexpected charges are accruing. Unfortunately it doesn’t seem to be possible to see real-time charge-updates.
Conclusion
There you have it, a virtual machine provisioned through CloudFormation. It configured everything from virtual machine, to the network to the IP address.
However, CloudFormation allows us to do much more. Imagine provisioning a bunch of stacks like this for a particular application, we would still have to SSH into these machines and set up a web server or run whatever application we want manually. Wouldn’t it be great if we could automate that step as well, so that we don’t even need to SSH into any of the machines? CloudFormation can help us with that as well! In a future chapter I’ll dive into how we can further customize our YAML annotation to run our scripts, after we successfully spin up a virtual machine.
Please let me know if you have questions, comments and if this short introduction to CloudFormation was helpful.
Sample Project
References
AWS CloudFormation Documentation
Others
Thanks
Thanks to my coworker Alexandra for reviewing and giving me feedback on this article.
Originally published at Skofgar’s Blog.


